Author
Sahil Kumar
Publihsed On
Aug 18, 2024
Updated On
Aug 18, 2024
Category
PHP
Send Mail with Contact Form Using PHPMailer & Gmail SMTP | 2023
Simplify email communication on websites by seamlessly integrating contact forms using PHPMailer and Gmail SMTP. This dynamic duo empowers developers to create efficient communication channels, offering secure and reliable messaging between users and businesses. By configuring PHPMailer to work with Gmail's SMTP service and utilizing app-specific passwords, developers ensure smooth email delivery, enriching user experiences while upholding stringent security standards. This approach streamlines the process, making communication hassle-free while maintaining data integrity and user trust.
Gmail has made changes to its security settings, and now it requires the use of app-specific passwords instead of enabling "Less Secure Apps" for certain applications, including PHPMailer. So later in this post we'll see how to generate this password.
Now all the process will be shown below in step by step:
1. Create Project
In first step create a project directory inside your htdocs folder with any name you want. I'm keeping project name as phpmailer.
2. Design Contact Form
In this step, we'll design our Contact us form using Bootstrap 5. So, let's create a file index.php in the root of project directory. And just copy and paste the below code into your created index.php file.
<!DOCTYPE html>
<html lang="en">

<head>
  <meta charset="UTF-8">
  <meta name="viewport" content="width=device-width, initial-scale=1.0">
  <title>Contact Form Using PHPMailer & Gmail SMTP</title>
  <link rel='stylesheet' href='https://cdnjs.cloudflare.com/ajax/libs/twitter-bootstrap/5.3.1/css/bootstrap.min.css' />
</head>

<body class="bg-dark-subtle">
  <div class="container">
    <div class="row min-vh-100 justify-content-center align-items-center">
      <div class="col-lg-5">
        <div class="card shadow-lg">
          <div class="card-header">
            <h3 class="text-center fw-bold">Contact Us</h3>
          </div>
          <div class="card-body p-5">
            <div class="alert d-none" id="alertMessage">
            </div>
            <form method="post" id="contactForm" autocomplete="off">
              <div class="form-floating mb-3">
                <input class="form-control" id="inputName" type="text" name="name" placeholder="Name" required />
                <label for="inputName">Name</label>
              </div>
              <div class="form-floating mb-3">
                <input class="form-control" id="inputEmail" type="email" name="email" placeholder="Email address" required />
                <label for="inputEmail">Email address</label>
              </div>
              <div class="form-floating mb-3">
                <input class="form-control" id="inputPhone" type="tel" name="phone" placeholder="Phone number" required />
                <label for="inputPhone">Phone number</label>
              </div>
              <div class="form-floating mb-3">
                <textarea class="form-control" id="inputMessage" name="message" placeholder="Message" style="height: 10rem" required></textarea>
                <label for="inputMessage">Message</label>
              </div>
              <div class="mt-4 mb-0">
                <button class="btn btn-primary" id="btn" type="submit">Send Message</button>
              </div>
            </form>
          </div>
        </div>
      </div>
    </div>
  </div>
  <script>
    const contactForm = document.querySelector('#contactForm');
    const btn = document.querySelector('#btn');
    const alertMessage = document.querySelector('#alertMessage');

    contactForm.addEventListener('submit', function(e) {
      btn.textContent = 'Sending...';
      btn.disabled = true;
      e.preventDefault();
      const formData = new FormData(this);
      fetch('sendmail.php', {
          method: 'post',
          body: formData
        })
        .then(function(response) {
          return response.text();
        })
        .then(function(text) {
          if (text === 'success') {
            btn.textContent = 'Send Message';
            btn.disabled = false;
            alertMessage.classList.remove('d-none');
            alertMessage.classList.add('alert-success');
            alertMessage.innerHTML = 'Your message has been sent!';
          } else {
            btn.textContent = 'Send Message';
            btn.disabled = false;
            alertMessage.classList.remove('d-none');
            alertMessage.classList.add('alert-danger');
            alertMessage.innerHTML = 'Something went wrong!';
          }
        })
        .catch(function(error) {
          console.error(error);
        })
    });
  </script>
</body>

</html>
In the above code you can see I'm using Ajax request to send form data to sendmail.php file. Now this is the main file where we'll see how to send mail using PHPMailer library.
3. PHPMailer Installation
In this step we'll see how to install PHPMailer library in our project. So, let's open your terminal and use below command to download and install PHPMailer library.
composer require phpmailer/phpmailer4. Working on sendmail.php file
Now this is the most important file, here we'll process the form data and send email to the recipient email address. So let's create a new file with name sendmail.php and just copy and paste the below code into your created file.
<?php

use PHPMailer\PHPMailer\PHPMailer;
use PHPMailer\PHPMailer\SMTP;
use PHPMailer\PHPMailer\Exception;

require_once 'vendor/autoload.php';

$mail = new PHPMailer(true);

try {

  // $mail->SMTPDebug = SMTP::DEBUG_SERVER;
  $mail->isSMTP();
  $mail->Host       = 'smtp.gmail.com';
  $mail->SMTPAuth   = true;
  $mail->Username   = '[email protected]';
  $mail->Password   = 'your_gmail_app_password';
  $mail->SMTPSecure = PHPMailer::ENCRYPTION_STARTTLS;
  $mail->Port       = 587;


  $mail->setFrom('[email protected]', 'Name');
  $mail->addAddress('[email protected]');
  $mail->addReplyTo($_POST['email'], $_POST['name']);

  $mail->isHTML(true);
  $mail->Subject = "Contact Form Submission from: {$_POST['name']}";
  $mail->Body    = "<h3>Name : {$_POST['name']}</h3><br>
                    <h3>Email : {$_POST['email']}</h3><br>
                    <h3>Phone : {$_POST['phone']}</h3><br>
                    <h3>Message : {$_POST['message']}</h3><br>";

  $mail->send();
  echo 'success';
} catch (Exception $e) {
  echo "Message could not be sent. Mailer Error: {$mail->ErrorInfo}";
}
5. Setting Configuration of Gmail SMTP
In this step, you can see in sendmail.php file all the codes are already written you only have to change some of them to make the Contact form working.
You only need to change these settings:
  $mail->Username = ''; // Your Gmail address
  $mail->Password = ''; // Your Gmail App password
  $mail->setFrom(''); // Your Gmail address (again)
  $mail->addAddress(''); // Your recipient, where the email will be sent
6. Creating App Password
Now in this step we'll generate App password from Gmail account. So just follow the below steps:
Login to your Gmail account, once logged in click on the top right corner on your user profile image. See below screenshot:

After that click on the Manage your Google Account, as shown in the screenshot:

After that click on Security link, as shown in the screenshot:

Now the most important thing to notice here is that you can only generate App password if 2nd-Step Verification is enabled on your Gmail account. So, if this is not enabled in your account then first enable 2nd-Step Verification after that click on arrow icon as shown in the screenshot:

Now scroll down below you will see App passwords section again click on the arrow icon as shown in the screenshot below:

Now you select mail from first drop down and other from second drop down as show in the screenshots below:


Now you will see a textbox just enter the name of your application (anything you want) and then click on generate button:

Finally, you will get your app password.

Just copy and paste in the sendmail.php file
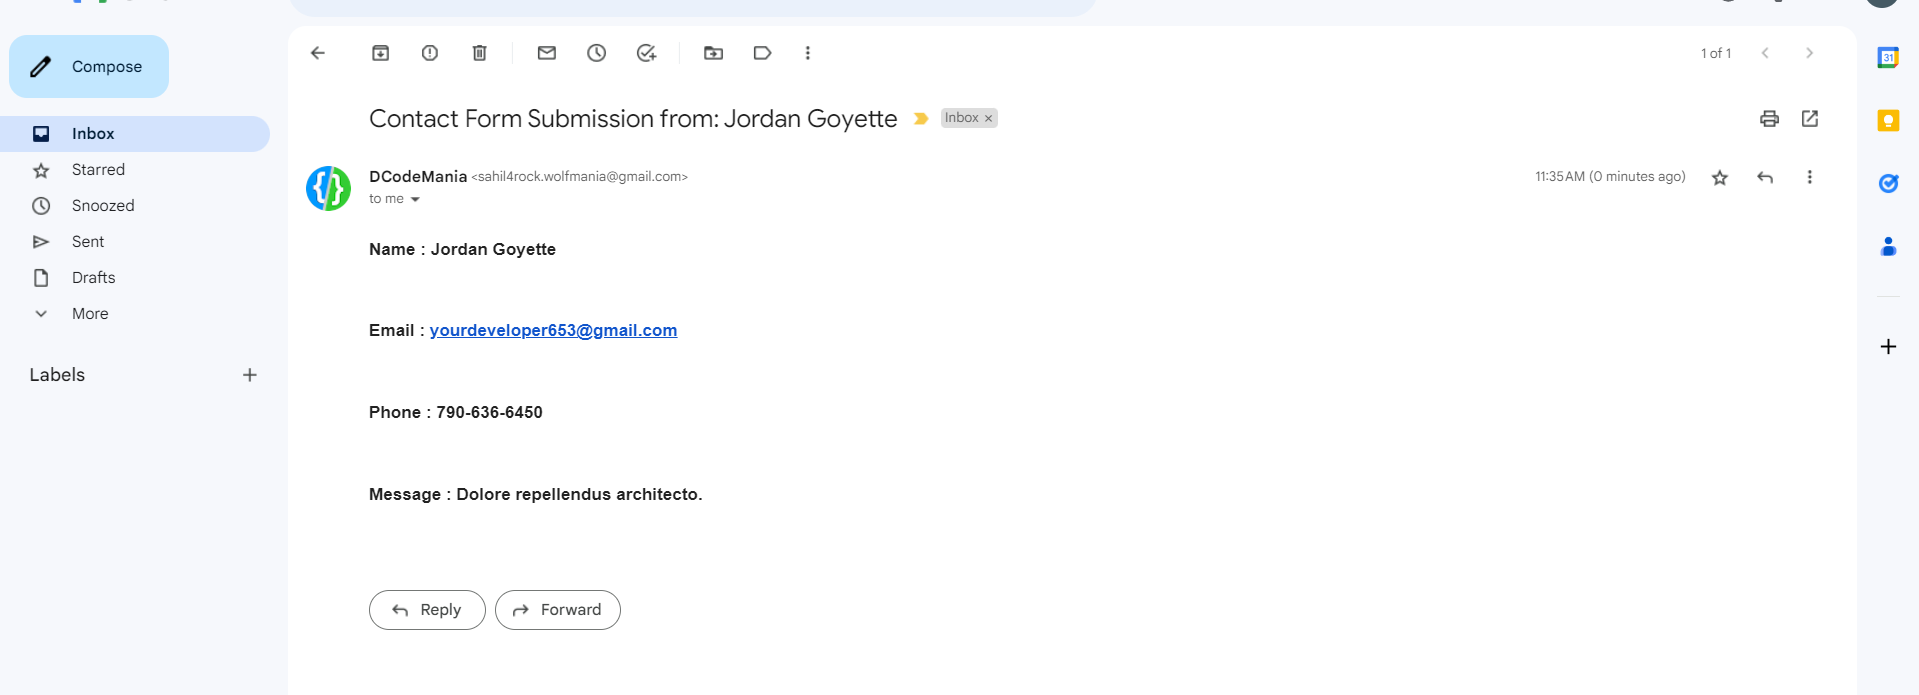
$mail->Password = 'lqcqtewjmjdxdxwm'; // Your Gmail App passwordNow everything is completed, it's time to test the Contact form. So, for this just run your app fill and submit the form. If all is correct, then you will receive a mail with all the details in your recipient email address.
See below screenshots:


If you want to download this project, then you can get the whole source code from this GitHub repo: https://github.com/DCodeMania/send-mail-contact-form-phpmailer-gmail-smtp

Sahil Kumar
Full Stack Web Developer
Hello! I'm a part-time blogger & YouTuber living in India. This is my personal blog where I write Web Design & Development tutorial posts!
Know more about me
SUBMIT GUEST POST 🚀
Ready to contribute? Head to the article dashboard to publish your own insightful articles and share them with our audience!
Go to dashboardRECENT POSTS

How Fintech Startups Can Leverage Custom Software Development for Success
7 months ago

Laravel Filament and Livewire
9 months ago

Building a Secure Authentication System with PHP OOP, PDO, MySQL, and Bootstrap 5
1 year ago

10 Essential Web Design Principles for Creating a User-Friendly Website
1 year ago

Send Mail with Contact Form Using PHPMailer & Gmail SMTP | 2023
1 year ago