
Author
Sahil Kumar
Publihsed On
Dec 16, 2025
Updated On
Dec 18, 2025
Category
React
Full Stack Laravel 10 & React JS | SPA Authentication | Part 2
Introduction
Full Stack Laravel 10 & React JS is a robust technology stack used for building modern web applications. When combined, they provide a seamless and intuitive user experience that is both responsive and secure. One critical aspect of building such applications is implementing authentication, which ensures that only authorized users can access sensitive data and perform specific actions.
To implement SPA authentication in Full Stack Laravel 10 & React JS, Laravel Sanctum is a lightweight and token-based authentication package that can be used to secure API endpoints. Laravel Sanctum allows developers to generate and manage API tokens, which can be used to authenticate users' requests and provide access to protected resources.
When using Laravel Sanctum for SPA authentication, developers can choose to implement either stateless or stateful requests. Stateful requests involve persisting a user's authentication state on the server-side, while stateless requests do not. In stateful requests, the user's authentication state is stored on the server, and the user is identified using a session cookie. In contrast, stateless requests involve sending the API token with each request, and the server verifies the token's validity before responding.
Implementing stateful requests in Laravel Sanctum involves configuring session driver and stateful domain, while implementing stateless requests involves setting up middleware that checks for the token in the request headers.
Overall, Full Stack Laravel 10 & React JS with Laravel Sanctum provides developers with a robust and secure way to implement SPA authentication. Whether using stateful or stateless requests, Laravel Sanctum makes it easy to manage user authentication and authorization, providing developers with a secure and flexible way to build modern web applications.
This is the 2nd Part of the Full Stack Laravel 10 & React.js 18 series. In this part We'll see how to create React app and consume API that we have already seen in Part 1.
We'll see all the process in step by step:
Step 1: Install React Using Vite
Make sure you have Node.js and npm installed on your computer. You can check by running node -v and npm -v in your terminal.
# npm 6.x
npm create vite@latest frontend --template react

# npm 7+, extra double-dash is needed:
npm create vite@latest frontend -- --template react
Once you run above command then a directory named frontend will be created, now open this directory in VS Code.
Step 2: Installing Other Dependencies
We'll also use some other dependencies, in this React app, so to install all dependencies just follow the below command:
npm install react-router-dom axios flowbite flowbite-reactWe'll also use some dev dependencies, so to install all dev dependencies just follow the following command:
npm install -D tailwindcss postcss autoprefixer
npx tailwindcss init -p
Install tailwindcss and its peer dependencies via npm, and then run the init command to generate both tailwind.config.cjs and postcss.config.cjs.
Now here We are using react-router-dom for routing, axios for sending HTTP request, consuming backend, flowbite is a user interface (UI) kit and design system for building web applications. It is designed to help developers and designers create beautiful and responsive web interfaces quickly and easily. Flowbite provides a comprehensive set of UI components and templates that are designed to work together seamlessly, making it easy to create consistent and visually appealing web applications.
Step 3: Configuring Some Files
First, we'll open package.json file and add port in dev script like below, this will open our dev server in localhost with port = 3000.
"scripts": {
	"dev": "vite --port=3000",
	"build": "vite build",
	"preview": "vite preview"
},
Next, we'll open tailwind.config.cjs file and update with below codes:
/** @type {import('tailwindcss').Config} */
module.exports = {
  content: [
    "./index.html",
    "./src/**/*.{js,ts,jsx,tsx}",
  ],
  darkMode: 'media',
  theme: {
    container: {
      padding: {
        DEFAULT: '1rem',
        sm: '2rem',
        lg: '4rem',
        xl: '5rem',
        '2xl': '6rem',
      },
    },
    extend: {
      colors: {
        primary: { "50": "#eff6ff", "100": "#dbeafe", "200": "#bfdbfe", "300": "#93c5fd", "400": "#60a5fa", "500": "#3b82f6", "600": "#2563eb", "700": "#1d4ed8", "800": "#1e40af", "900": "#1e3a8a" }
      }
    },
    fontFamily: {
      'body': [
        'Inter',
        'ui-sans-serif',
        'system-ui',
        '-apple-system',
        'system-ui',
        'Segoe UI',
        'Roboto',
        'Helvetica Neue',
        'Arial',
        'Noto Sans',
        'sans-serif',
        'Apple Color Emoji',
        'Segoe UI Emoji',
        'Segoe UI Symbol',
        'Noto Color Emoji'
      ],
      'sans': [
        'Inter',
        'ui-sans-serif',
        'system-ui',
        '-apple-system',
        'system-ui',
        'Segoe UI',
        'Roboto',
        'Helvetica Neue',
        'Arial',
        'Noto Sans',
        'sans-serif',
        'Apple Color Emoji',
        'Segoe UI Emoji',
        'Segoe UI Symbol',
        'Noto Color Emoji'
      ]
    }
  },
  plugins: [
    require('flowbite/plugin')
  ],
}
Next, we'll open src/index.css file and just use the below codes:
@tailwind base;
@tailwind components;
@tailwind utilities;
Step 4: Working on Project Structure
In this step we'll create some directory and files inside src directory.
So, let's first create a components directory inside src directory. Now inside components directory we'll create two components:
- GuestLayout.jsx
- ProtectedLayout.jsx
These two components are the layouts components.
Next, we'll create pages directory inside src directory, and inside pages we'll create pages like:
- Login.jsx
- Register.jsx
- Profile.jsx
- About.jsx
Next, we'll create a contexts directory inside src directory, and inside this directory we'll a single file:
- AuthContext.jsx
Step 5: Working on Router file
In this step we'll create a file inside src directory named router.js, inside this file just use below codes:
import { createBrowserRouter } from 'react-router-dom';
import Login from './pages/Login';
import About from './pages/About';
import Profile from './pages/Profile';
import Register from './pages/Register';
import ProtectedLayout from './components/ProtectedLayout';
import GuestLayout from './components/GuestLayout';

const router = createBrowserRouter([
	{
		path: '/',
		element: <GuestLayout />,
		children: [
			{
				path: '/',
				element: <Login />,
			},
			{
				path: '/register',
				element: <Register />,
			},
		],
	},
	{
		path: '/',
		element: <ProtectedLayout />,
		children: [
			{
				path: '/about',
				element: <About />,
			},
			{
				path: '/profile',
				element: <Profile />,
			},
		],
	},
]);

export default router;
The code above is setting up a router using createBrowserRouter from the react-router-dom library. This router is defining the routes for a web application with different layouts for guest and authenticated users.
The router is defined as an array of route objects. Each route object contains a path property which represents the URL path for that route, and an element property which specifies the component to be rendered when the path is matched.
The first route object is defining routes for guest users. The element property is set to a GuestLayout component, which will be used as the layout for these routes. The children property is an array of nested route objects, which define the specific pages that should be displayed within this layout. In this case, there are two routes defined - one for the login page (path: '/') and one for the registration page (path: '/register').
The second route object is defining routes for authenticated users. The element property is set to a ProtectedLayout component, which will be used as the layout for these routes. Similarly to the previous route object, the children property is an array of nested route objects, which define the specific pages that should be displayed within this layout. In this case, there are two routes defined - one for the about page (path: '/about') and one for the user profile page (path: '/profile').
Step 6: Working AuthContext.jsx file
This file is already created now, open this src/contexts/AuthContext.jsx file and just below codes:
import { createContext, useContext, useState } from 'react';
import axios from '../axios';

const AuthContent = createContext({
	user: null,
	setUser: () => {},
	csrfToken: () => {},
});

export const AuthProvider = ({ children }) => {
	const [user, _setUser] = useState(
		JSON.parse(localStorage.getItem('user')) || null
	);

	// set user to local storage
	const setUser = (user) => {
		if (user) {
			localStorage.setItem('user', JSON.stringify(user));
		} else {
			localStorage.removeItem('user');
		}
		_setUser(user);
	};

	// csrf token generation for guest methods
	const csrfToken = async () => {
		await axios.get('http://localhost:8000/sanctum/csrf-cookie');
		return true;
	};

	return (
		<AuthContent.Provider value={{ user, setUser, csrfToken }}>
			{children}
		</AuthContent.Provider>
	);
};

export const useAuth = () => {
	return useContext(AuthContent);
};
This code above is a React context provider and hook that manages authentication state for a web application.
The AuthProvider component creates a new context called AuthContent using the createContext function from React. This context provides a default value with a user object set to null, and two functions: setUser, which updates the user object with a new value, and csrfToken, which generates a CSRF token for guest methods.
Inside the AuthProvider, the user state is initialized using useState and the value is retrieved from local storage using JSON.parse(localStorage.getItem('user')). If there is no user value in local storage, the default value of null is used.
The setUser function updates the user state and sets the user object to local storage using JSON.stringify and localStorage.setItem.
The csrfToken function generates a CSRF token by making a GET request to the sanctum/csrf-cookie endpoint using axios.
The AuthProvider component returns the AuthContent.Provider component with the value prop set to an object that contains the user, setUser, and csrfToken values, as well as the children prop, which will be the child components that need access to the authentication state.
The useAuth hook uses the useContext hook to retrieve the AuthContent context and return the value object, which contains the user, setUser, and csrfToken values. This hook can be used in child components to access the authentication state and perform actions based on the user's authentication status.
Step 7: Creating axios.js File
In src directory let's create another file which is axios.js and use below codes:
import Axios from 'axios';

const axios = Axios.create({
	baseURL: "http://localhost:8000/api",
	withCredentials: true,
	headers: {
		"Content-Type": "application/json",
		"Accept": "application/json",
	},
});

export default axios;
This is a JavaScript code that creates an Axios instance with some default configurations and exports it as a module. Axios is a popular HTTP client library for making AJAX requests from JavaScript applications.
Here's a breakdown of what each part of the code does:
- The first line imports the Axios library.
- The next line creates a new Axios instance using the create method. It sets the baseURL to http://localhost:8000/api, which is the base URL for all the API endpoints. It also sets withCredentials to true, which means that cookies will be sent along with the requests, allowing for authenticated requests. Finally, it sets the default Content-Type header to application/json and Accept header to application/json.
- The last line exports the newly created Axios instance as a module, making it available for other modules to import and use.
Step 8: Working on Layout Files
We already created two layouts file inside components directory. Just open GuestLayout.jsx and use below codes:
import React from 'react';
import { Navigate, Outlet } from 'react-router-dom';
import { useAuth } from '../contexts/AuthContext';

export default function GuestLayout() {
	const { user } = useAuth();

	// if user is logged in, redirect to profile page
	if (user) {
		return <Navigate to="/profile" />;
	}
	return (
		<>
			<Outlet />
		</>
	);
}
Now open ProtectedLayout.jsx file and use below codes:
import React, { useEffect } from 'react';
import { Navigate, Outlet } from 'react-router-dom';
import { NavLink } from 'react-router-dom';
import axios from '../axios';
import { useAuth } from '../contexts/AuthContext';

export default function DefaultLayout() {
	const { user, setUser } = useAuth();

	// check if user is logged in or not from server
	useEffect(() => {
		(async () => {
			try {
				const resp = await axios.get('/user');
				if (resp.status === 200) {
					setUser(resp.data.data);
				}
			} catch (error) {
				if (error.response.status === 401) {
					localStorage.removeItem('user');
					window.location.href = '/';
				}
			}
		})();
	}, []);

	// if user is not logged in, redirect to login page
	if (!user) {
		return <Navigate to="/" />;
	}

	// logout user
	const handleLogout = async () => {
		try {
			const resp = await axios.post('/logout');
			if (resp.status === 200) {
				localStorage.removeItem('user');
				window.location.href = '/';
			}
		} catch (error) {
			console.log(error);
		}
	};
	return (
		<>
			<nav className="bg-white border-gray-200 px-2 sm:px-4 py-2.5 dark:bg-gray-900">
				<div className="container flex flex-wrap items-center justify-between mx-auto">
					<a href="https://dcodemania.com/" className="flex items-center">
						<img
							src="https://dcodemania.com/img/logo.svg"
							className="h-6 mr-3 sm:h-9"
							alt="DCodeMania Logo"
						/>
						<span className="self-center text-xl font-semibold whitespace-nowrap dark:text-white">
							DCodeMania
						</span>
					</a>
					<button
						data-collapse-toggle="navbar-default"
						type="button"
						className="inline-flex items-center p-2 ml-3 text-sm text-gray-500 rounded-lg md:hidden hover:bg-gray-100 focus:outline-none focus:ring-2 focus:ring-gray-200 dark:text-gray-400 dark:hover:bg-gray-700 dark:focus:ring-gray-600"
						aria-controls="navbar-default"
						aria-expanded="false">
						<span className="sr-only">Open main menu</span>
						<svg
							className="w-6 h-6"
							aria-hidden="true"
							fill="currentColor"
							viewBox="0 0 20 20"
							xmlns="http://www.w3.org/2000/svg">
							<path
								fillRule="evenodd"
								d="M3 5a1 1 0 011-1h12a1 1 0 110 2H4a1 1 0 01-1-1zM3 10a1 1 0 011-1h12a1 1 0 110 2H4a1 1 0 01-1-1zM3 15a1 1 0 011-1h12a1 1 0 110 2H4a1 1 0 01-1-1z"
								clipRule="evenodd"></path>
						</svg>
					</button>
					<div className="hidden w-full md:block md:w-auto" id="navbar-default">
						<ul className="flex flex-col p-4 mt-4 border border-gray-100 rounded-lg bg-gray-50 md:flex-row md:space-x-8 md:mt-0 md:text-sm md:font-medium md:border-0 md:bg-white dark:bg-gray-800 md:dark:bg-gray-900 dark:border-gray-700">
							<li>
								<NavLink
									to="/profile"
									className={({ isActive }) =>
										isActive
											? 'block py-2 pl-3 pr-4 text-white bg-blue-700 rounded md:bg-transparent md:text-blue-700 md:p-0 dark:text-white'
											: 'block py-2 pl-3 pr-4 rounded md:bg-transparent md:p-0 dark:text-gray-400 md:dark:hover:text-white'
									}>
									Profile
								</NavLink>
							</li>
							<li>
								<NavLink
									to="/about"
									className={({ isActive }) =>
										isActive
											? 'block py-2 pl-3 pr-4 text-white bg-blue-700 rounded md:bg-transparent md:text-blue-700 md:p-0 dark:text-white'
											: 'block py-2 pl-3 pr-4 rounded md:bg-transparent md:p-0 dark:text-gray-400 md:dark:hover:text-white'
									}>
									About
								</NavLink>
							</li>

							<li>
								<a
									onClick={handleLogout}
									href="#"
									className="block py-2 pl-3 pr-4 text-gray-700 rounded hover:bg-gray-100 md:hover:bg-transparent md:border-0 md:hover:text-blue-700 md:p-0 dark:text-gray-400 md:dark:hover:text-white dark:hover:bg-gray-700 dark:hover:text-white md:dark:hover:bg-transparent">
									Logout
								</a>
							</li>
						</ul>
					</div>
				</div>
			</nav>
			<main className="container flex justify-center flex-col items-center mt-10">
				<Outlet />
			</main>
		</>
	);
}
this file contains header navigation part also.
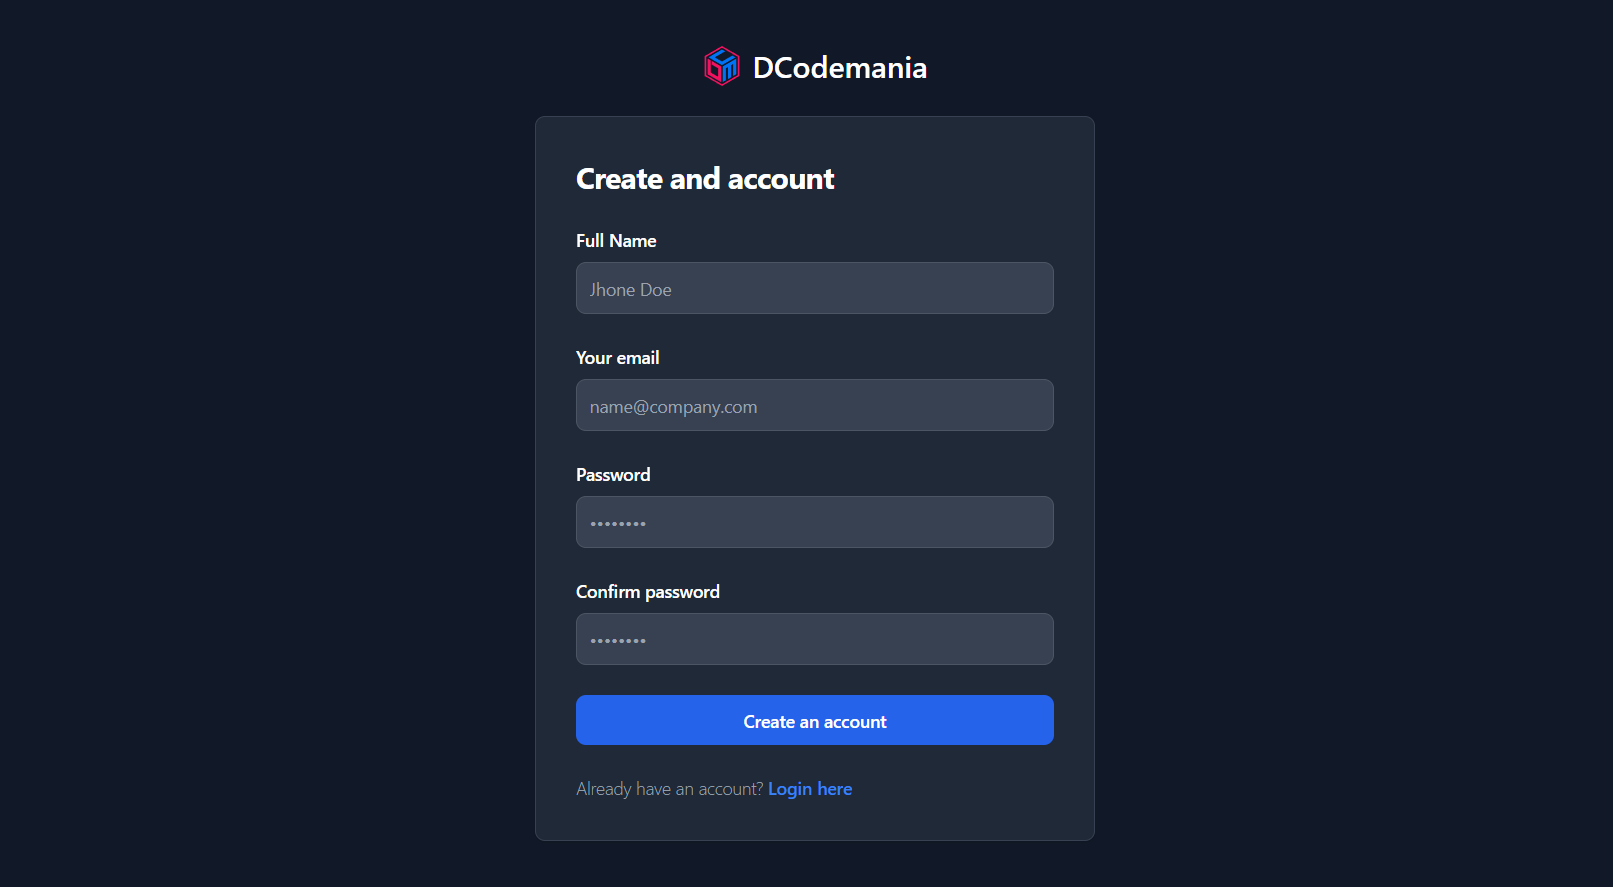
Step 9: Working on Register Page
We already created this file inside src/pages/Register.jsx just open and use below codes:
import React from 'react';
import { Link } from 'react-router-dom';
import axios from '../axios';
import { useAuth } from '../contexts/AuthContext';

export default function Register() {
	const { setUser } = useAuth();
	const [nameError, setNameError] = React.useState('');
	const [emailError, setEmailError] = React.useState('');
	const [passwordError, setPasswordError] = React.useState('');
	// register user
	const handleSubmit = async (e) => {
		e.preventDefault();
		const { name, email, password, cpassword } = e.target.elements;
		const body = {
			name: name.value,
			email: email.value,
			password: password.value,
			password_confirmation: cpassword.value,
		};
		try {
			const resp = await axios.post('/register', body);
			if (resp.status === 200) {
				setUser(resp.data.user);
				return <Navigate to="/profile" />;
			}
		} catch (error) {
			if (error.response.status === 422) {
				console.log(error.response.data.errors);
				if (error.response.data.errors.name) {
					setNameError(error.response.data.errors.name[0]);
				} else {
					setNameError('');
				}
				if (error.response.data.errors.email) {
					setEmailError(error.response.data.errors.email[0]);
				} else {
					setEmailError('');
				}
				if (error.response.data.errors.password) {
					setPasswordError(error.response.data.errors.password[0]);
				} else {
					setPasswordError('');
				}
			}
		}
	};

	return (
		<section className="bg-gray-50 dark:bg-gray-900">
			<div className="flex flex-col items-center justify-center px-6 py-8 mx-auto md:h-screen lg:py-0">
				<a
					href="#"
					className="flex items-center mb-6 text-2xl font-semibold text-gray-900 dark:text-white">
					<img
						className="w-8 h-8 mr-2"
						src="https://dcodemania.com/img/logo.svg"
						alt="logo"
					/>
					DCodemania
				</a>
				<div className="w-full bg-white rounded-lg shadow dark:border md:mt-0 sm:max-w-md xl:p-0 dark:bg-gray-800 dark:border-gray-700">
					<div className="p-6 space-y-4 md:space-y-6 sm:p-8">
						<h1 className="text-xl font-bold leading-tight tracking-tight text-gray-900 md:text-2xl dark:text-white">
							Create and account
						</h1>
						<form
							className="space-y-4 md:space-y-6"
							action="#"
							method="post"
							onSubmit={handleSubmit}>
							<div>
								<label
									htmlFor="name"
									className="block mb-2 text-sm font-medium text-gray-900 dark:text-white">
									Full Name
								</label>
								<input
									type="text"
									name="name"
									id="name"
									className="bg-gray-50 border border-gray-300 text-gray-900 sm:text-sm rounded-lg focus:ring-primary-600 focus:border-primary-600 block w-full p-2.5 dark:bg-gray-700 dark:border-gray-600 dark:placeholder-gray-400 dark:text-white dark:focus:ring-blue-500 dark:focus:border-blue-500"
									placeholder="Jhone Doe"
									required
								/>
								{nameError && (
									<p className="text-sm text-red-600">{nameError}</p>
								)}
							</div>
							<div>
								<label
									htmlFor="email"
									className="block mb-2 text-sm font-medium text-gray-900 dark:text-white">
									Your email
								</label>
								<input
									type="email"
									name="email"
									id="email"
									className="bg-gray-50 border border-gray-300 text-gray-900 sm:text-sm rounded-lg focus:ring-primary-600 focus:border-primary-600 block w-full p-2.5 dark:bg-gray-700 dark:border-gray-600 dark:placeholder-gray-400 dark:text-white dark:focus:ring-blue-500 dark:focus:border-blue-500"
									placeholder="name@company.com"
									required
								/>
								{emailError && (
									<p className="text-sm text-red-600">{emailError}</p>
								)}
							</div>
							<div>
								<label
									htmlFor="password"
									className="block mb-2 text-sm font-medium text-gray-900 dark:text-white">
									Password
								</label>
								<input
									type="password"
									name="password"
									id="password"
									placeholder="••••••••"
									className="bg-gray-50 border border-gray-300 text-gray-900 sm:text-sm rounded-lg focus:ring-primary-600 focus:border-primary-600 block w-full p-2.5 dark:bg-gray-700 dark:border-gray-600 dark:placeholder-gray-400 dark:text-white dark:focus:ring-blue-500 dark:focus:border-blue-500"
									required
								/>
								{passwordError && (
									<p className="text-sm text-red-600">{passwordError}</p>
								)}
							</div>
							<div>
								<label
									htmlFor="cpassword"
									className="block mb-2 text-sm font-medium text-gray-900 dark:text-white">
									Confirm password
								</label>
								<input
									type="password"
									name="cpassword"
									id="cpassword"
									placeholder="••••••••"
									className="bg-gray-50 border border-gray-300 text-gray-900 sm:text-sm rounded-lg focus:ring-primary-600 focus:border-primary-600 block w-full p-2.5 dark:bg-gray-700 dark:border-gray-600 dark:placeholder-gray-400 dark:text-white dark:focus:ring-blue-500 dark:focus:border-blue-500"
									required
								/>
							</div>

							<button
								type="submit"
								className="w-full text-white bg-primary-600 hover:bg-primary-700 focus:ring-4 focus:outline-none focus:ring-primary-300 font-medium rounded-lg text-sm px-5 py-2.5 text-center dark:bg-primary-600 dark:hover:bg-primary-700 dark:focus:ring-primary-800">
								Create an account
							</button>
							<p className="text-sm font-light text-gray-500 dark:text-gray-400">
								Already have an account?{' '}
								<Link
									to="/"
									className="font-medium text-primary-600 hover:underline dark:text-primary-500">
									Login here
								</Link>
							</p>
						</form>
					</div>
				</div>
			</div>
		</section>
	);
}
Step 9: Working on Login Page
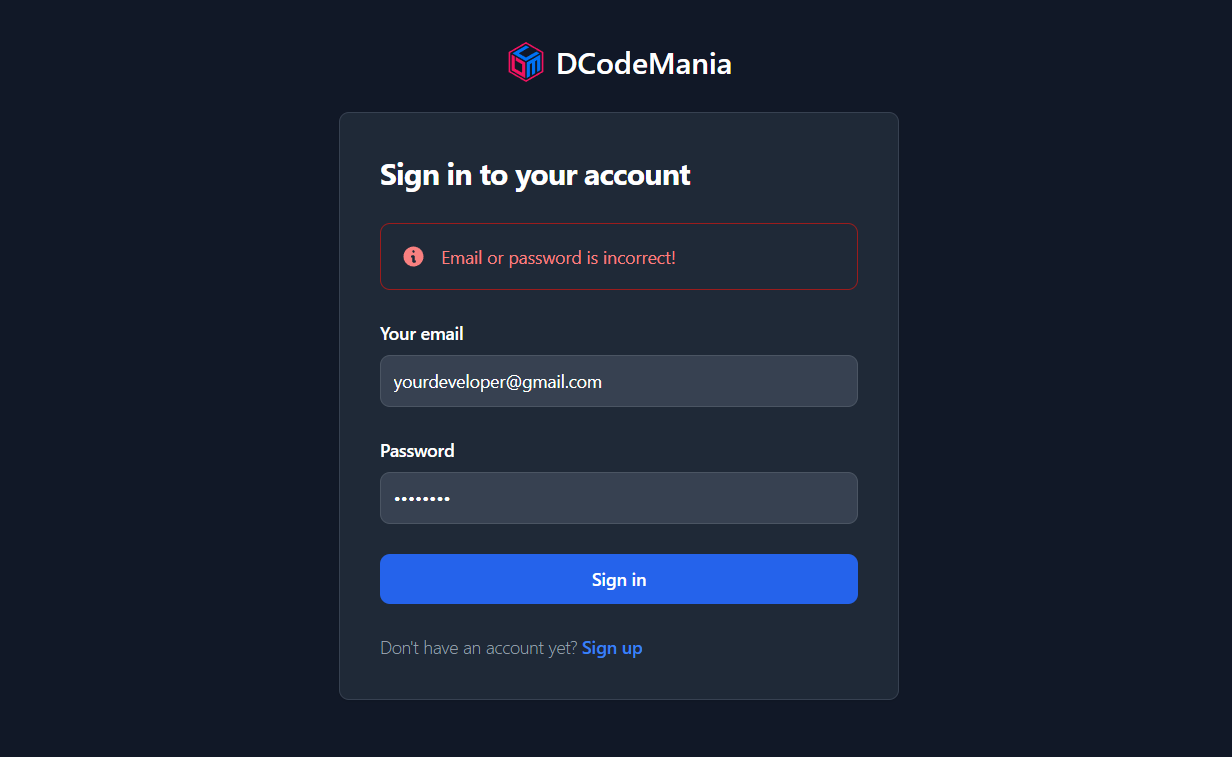
We already created this file inside src/pages/Login.jsx just open and use below codes:
import React from 'react';
import { Link, Navigate } from 'react-router-dom';
import axios from '../axios';
import { useAuth } from '../contexts/AuthContext';

export default function Login() {
	const { setUser, csrfToken } = useAuth();
	const [error, setError] = React.useState(null);

	// login user
	const handleSubmit = async (e) => {
		e.preventDefault();
		const { email, password } = e.target.elements;
		const body = {
			email: email.value,
			password: password.value,
		};
		await csrfToken();
		try {
			const resp = await axios.post('/login', body);
			if (resp.status === 200) {
				setUser(resp.data.user);
				return <Navigate to="/profile" />;
			}
		} catch (error) {
			if (error.response.status === 401) {
				setError(error.response.data.message);
			}
		}
	};

	return (
		<section className="bg-gray-50 dark:bg-gray-900">
			<div className="flex flex-col items-center justify-center px-6 py-8 mx-auto md:h-screen lg:py-0">
				<a
					href="#"
					className="flex items-center mb-6 text-2xl font-semibold text-gray-900 dark:text-white">
					<img
						className="w-8 h-8 mr-2"
						src="https://dcodemania.com/img/logo.svg"
						alt="logo"
					/>
					DCodeMania
				</a>
				<div className="w-full bg-white rounded-lg shadow dark:border md:mt-0 sm:max-w-md xl:p-0 dark:bg-gray-800 dark:border-gray-700">
					<div className="p-6 space-y-4 md:space-y-6 sm:p-8">
						<h1 className="text-xl font-bold leading-tight tracking-tight text-gray-900 md:text-2xl dark:text-white">
							Sign in to your account
						</h1>
						{error && (
							<div
								className="flex p-4 mb-4 text-sm text-red-800 border border-red-300 rounded-lg bg-red-50 dark:bg-gray-800 dark:text-red-400 dark:border-red-800"
								role="alert">
								<svg
									aria-hidden="true"
									className="flex-shrink-0 inline w-5 h-5 mr-3"
									fill="currentColor"
									viewBox="0 0 20 20"
									xmlns="http://www.w3.org/2000/svg">
									<path
										fillRule="evenodd"
										d="M18 10a8 8 0 11-16 0 8 8 0 0116 0zm-7-4a1 1 0 11-2 0 1 1 0 012 0zM9 9a1 1 0 000 2v3a1 1 0 001 1h1a1 1 0 100-2v-3a1 1 0 00-1-1H9z"
										clipRule="evenodd"></path>
								</svg>
								<span className="sr-only">Info</span>
								<div>{error}</div>
							</div>
						)}

						<form
							className="space-y-4 md:space-y-6"
							action="#"
							method="post"
							onSubmit={handleSubmit}>
							<div>
								<label
									htmlFor="email"
									className="block mb-2 text-sm font-medium text-gray-900 dark:text-white">
									Your email
								</label>
								<input
									type="email"
									name="email"
									id="email"
									className="bg-gray-50 border border-gray-300 text-gray-900 sm:text-sm rounded-lg focus:ring-primary-600 focus:border-primary-600 block w-full p-2.5 dark:bg-gray-700 dark:border-gray-600 dark:placeholder-gray-400 dark:text-white dark:focus:ring-blue-500 dark:focus:border-blue-500"
									placeholder="name@company.com"
									required
								/>
							</div>
							<div>
								<label
									htmlFor="password"
									className="block mb-2 text-sm font-medium text-gray-900 dark:text-white">
									Password
								</label>
								<input
									type="password"
									name="password"
									id="password"
									placeholder="••••••••"
									className="bg-gray-50 border border-gray-300 text-gray-900 sm:text-sm rounded-lg focus:ring-primary-600 focus:border-primary-600 block w-full p-2.5 dark:bg-gray-700 dark:border-gray-600 dark:placeholder-gray-400 dark:text-white dark:focus:ring-blue-500 dark:focus:border-blue-500"
									required
								/>
							</div>

							<button
								type="submit"
								className="w-full text-white bg-primary-600 hover:bg-primary-700 focus:ring-4 focus:outline-none focus:ring-primary-300 font-medium rounded-lg text-sm px-5 py-2.5 text-center dark:bg-primary-600 dark:hover:bg-primary-700 dark:focus:ring-primary-800">
								Sign in
							</button>
							<p className="text-sm font-light text-gray-500 dark:text-gray-400">
								Don't have an account yet?{' '}
								<Link
									to="/register"
									className="font-medium text-primary-600 hover:underline dark:text-primary-500">
									Sign up
								</Link>
							</p>
						</form>
					</div>
				</div>
			</div>
		</section>
	);
}
Step 10: Working on Profile Page
We already created this file inside src/pages/Profile.jsx just open and use below codes:
import React from 'react';
import { useAuth } from '../contexts/AuthContext';

export default function Profile() {
	const { user } = useAuth();
	return (
		<>
			<div className="text-6xl font-bold text-slate-600">User Profile</div>
			<hr className="bg-slate-400 h-1 w-full my-4" />
			<div className="block p-10 bg-white border border-gray-200 shadow-xl rounded-lg shadowdark:border-gray-700">
				<h5 className="my-2 text-2xl font-bold tracking-tight">
					Name: {user.name}
				</h5>
				<p className="font-normal text-gray-700">Email: {user.email}</p>
				<p className="font-normal text-gray-700">
					Created At: {user.created_at}
				</p>
			</div>
		</>
	);
}
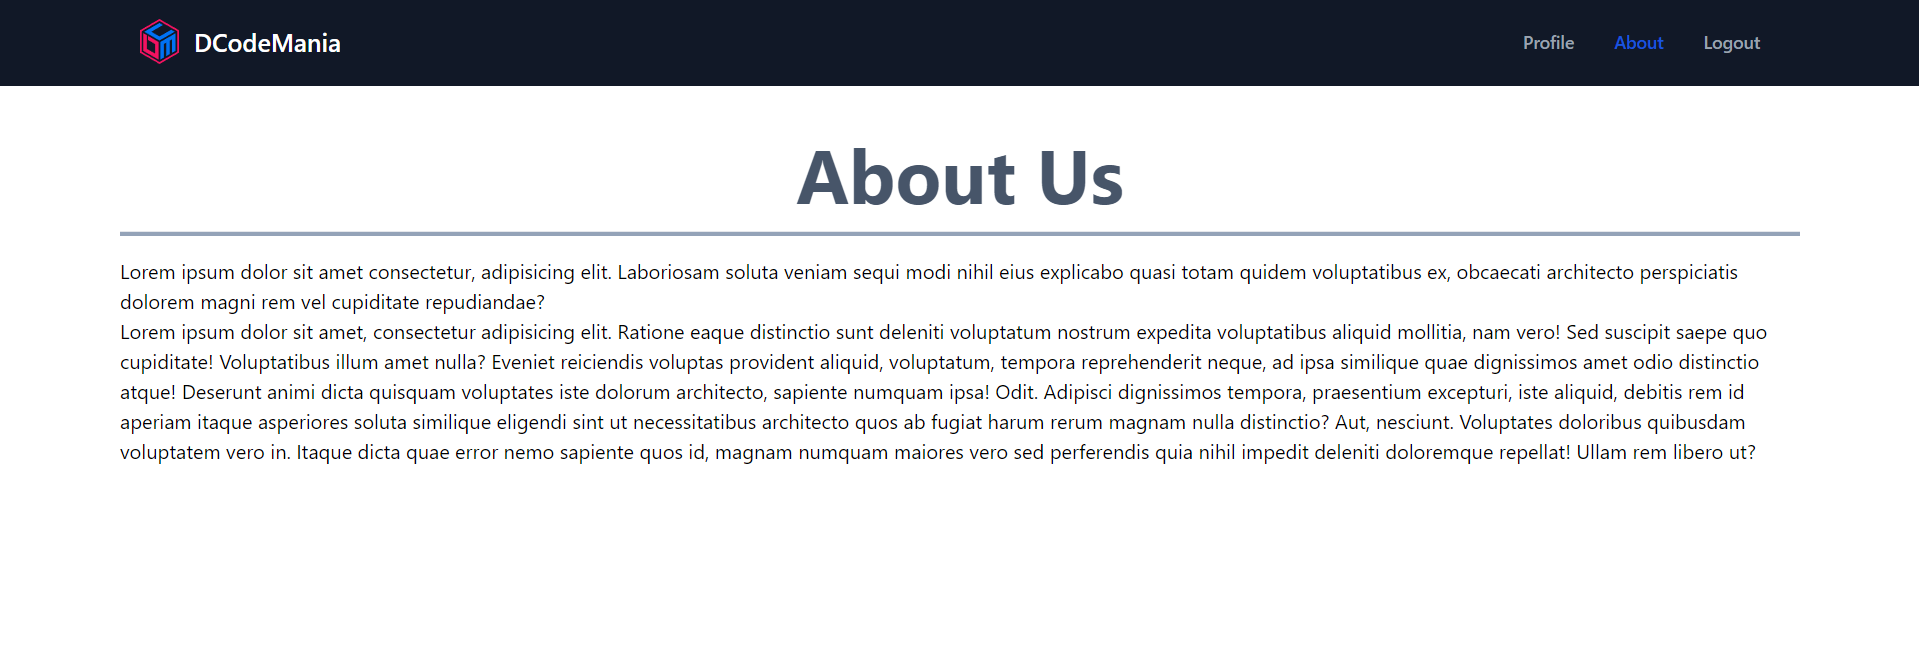
Step 11: Working on About Page
We already created this file inside src/pages/About.jsx just open and use below codes:
import React from 'react';

export default function About() {
	return (
		<>
			<div className="text-6xl font-bold text-slate-600">About Us</div>
			<hr className="bg-slate-400 h-1 w-full my-4" />
			<p>
				Lorem ipsum dolor sit amet consectetur, adipisicing elit. Laboriosam
				soluta veniam sequi modi nihil eius explicabo quasi totam quidem
				voluptatibus ex, obcaecati architecto perspiciatis dolorem magni rem vel
				cupiditate repudiandae?
			</p>
			<p>
				Lorem ipsum dolor sit amet, consectetur adipisicing elit. Ratione eaque
				distinctio sunt deleniti voluptatum nostrum expedita voluptatibus
				aliquid mollitia, nam vero! Sed suscipit saepe quo cupiditate!
				Voluptatibus illum amet nulla? Eveniet reiciendis voluptas provident
				aliquid, voluptatum, tempora reprehenderit neque, ad ipsa similique quae
				dignissimos amet odio distinctio atque! Deserunt animi dicta quisquam
				voluptates iste dolorum architecto, sapiente numquam ipsa! Odit.
				Adipisci dignissimos tempora, praesentium excepturi, iste aliquid,
				debitis rem id aperiam itaque asperiores soluta similique eligendi sint
				ut necessitatibus architecto quos ab fugiat harum rerum magnam nulla
				distinctio? Aut, nesciunt. Voluptates doloribus quibusdam voluptatem
				vero in. Itaque dicta quae error nemo sapiente quos id, magnam numquam
				maiores vero sed perferendis quia nihil impedit deleniti doloremque
				repellat! Ullam rem libero ut?
			</p>
		</>
	);
}
Step 12: Running React Application
We have successfully done all the coding part now just use below command to run this application:
npm run devthis command will run the application in the following URL: http://localhost:3000 just open this in your browser.
Step 13: Some Screenshots of the Application


You can also check the GitHub repository of this backend Laravel project.
Sahil Kumar
Full Stack Web Developer
Hello! I'm a part-time blogger & YouTuber living in India. This is my personal blog where I write Web Design & Development tutorial posts!
Know more about me
SUBMIT GUEST POST 🚀
Ready to contribute? Head to the article dashboard to publish your own insightful articles and share them with our audience!
Go to dashboardRECENT POSTS

How Digital Marketing Drives Growth in eCommerce Businesses
7 months ago

Building a Secure Authentication System with PHP OOP, PDO, MySQL, and Bootstrap 5
7 months ago

10 Essential Web Design Principles for Creating a User-Friendly Website
7 months ago

Send Mail with Contact Form Using PHPMailer & Gmail SMTP | 2023
7 months ago
Full Stack Laravel 10 & React JS | SPA Authentication | Part 2
7 months ago
POSTS TAGS
- #React.js
- #Laravel Sanctum
- #Authentication
- #Security
- #Front-end development
- #Back-end development
- #Web development
- #RESTful API
- #Single-page application (SPA)
- #JSON Web Tokens (JWT)
- #User authentication
- #User authorization
- #Cross-Origin Resource Sharing (CORS)
- #CSRF protection
- #Axios
- #API integration
- #Code examples
- #Tutorial
- #How-to guide.