Author
Sahil Kumar
Publihsed On
Dec 16, 2025
Updated On
Jan 01, 2026
Category
PHP
CRUD Application Using PHP, MySQLi Prepared Statement
Today In this post I'm going to show you how to develop a CRUD (Create, Read, Update, Delete) Application using Bootstrap 4, PHP, and MySQLi Prepared Statement. I'll use Bootstrap 4 to design the forms and other stuff, I'll use PHP as backend language and MySQL as Database. I'll use MySQLi Prepared Statement in Object-Oriented Style, I'll also use DataTable for Pagination, Sorting & Searching the records. In this CRUD Application, I'll also show you how to upload an image along with text inputs.
So without wasting any time let's start this tutorial. I'll write this post step by step so, you can understand it in the best way, and I'll also share all the source code here.
Creating a Project Directory
In this step, We'll create our project directory in the localhost, I'm using XAMPP Server so, I'll create a folder inside the htdocs folder. If you are using any other local or live server then create a project directory according to that. Name your project directory anything I'm keeping "crud-php-mysqli". Now once you created a project directory just open the directory inside your favourite code editor.
Creating Database & Table
Before going to create any files in the project directory, first We'll create a Database and Table for our CRUD Application. So for this open your phpmyadmin and create a new Database, name it "crud_db". Now for the table don't worry I'm giving a SQL file, you just have to download this file from here and import it into your created database, for this just click on your database and then click on the Import tab now click on Choose File and select the downloaded SQL file and then click on Go. Now, the Database & Table for the CURD Application has been ready.
Creating a config.php file
Before coding anything first We'll create a new "config.php" file in the root of the project directory, Now inside this file, We'll write a PHP script for the connection to the database. So just copy the below code and paste into your file and save it.
<?php
	const DBHOST = 'localhost';
	const DBUSER = 'root';
	const DBPASS = '';
	const DBNAME = 'crud_db';

	$conn = new mysqli(DBHOST, DBUSER, DBPASS, DBNAME);

	if ($conn->connect_error) {
	  die('Could not connect to the database!' . $conn->connect_error);
	}
?>
Creating an index.php file
In this step, We'll create our main landing page in the root of the project directory, In which I'll design a navbar on the top, a form on the left side and I'll also display the records on the right side on the same page in tabular form. Just copy the below codes and paste into your index.php file and save them.
<?php
include 'action.php';
?>
<!DOCTYPE html>
<html lang="en">
<head>
<meta charset="UTF-8">
<meta name="author" content="Sahil Kumar">
<meta http-equiv="X-UA-Compatible" content="IE=edge">
<meta name="viewport" content="width=device-width, initial-scale=1, shrink-to-fit=no">
<title>CRUD App</title>
<!-- Latest compiled and minified CSS -->
<link rel="stylesheet" href="https://maxcdn.bootstrapcdn.com/bootstrap/4.1.3/css/bootstrap.min.css">
<!-- jQuery library -->
<script src="https://ajax.googleapis.com/ajax/libs/jquery/3.3.1/jquery.min.js"></script>
<!-- Popper JS -->
<script src="https://cdnjs.cloudflare.com/ajax/libs/popper.js/1.14.3/umd/popper.min.js"></script>
<!-- Latest compiled JavaScript -->
<script src="https://maxcdn.bootstrapcdn.com/bootstrap/4.1.3/js/bootstrap.min.js"></script>
<link rel="stylesheet" type="text/css" href="https://cdn.datatables.net/v/bs4/dt-1.10.18/datatables.min.css" />
<script type="text/javascript" src="https://cdn.datatables.net/v/bs4/dt-1.10.18/datatables.min.js"></script>
</head>
<body>
<nav class="navbar navbar-expand-md bg-dark navbar-dark">
<!-- Brand -->
<a class="navbar-brand" href="#">CRUD App</a>
<!-- Toggler/collapsibe Button -->
<button class="navbar-toggler" type="button" data-toggle="collapse" data-target="#collapsibleNavbar">
<span class="navbar-toggler-icon"></span>
</button>
<!-- Navbar links -->
<div class="collapse navbar-collapse" id="collapsibleNavbar">
<ul class="navbar-nav">
<li class="nav-item">
<a class="nav-link" href="#">Features</a>
</li>
<li class="nav-item">
<a class="nav-link" href="#">Services</a>
</li>
<li class="nav-item">
<a class="nav-link" href="#">About</a>
</li>
</ul>
</div>
<form class="form-inline" action="/action_page.php">
<input class="form-control mr-sm-2" type="text" placeholder="Search">
<button class="btn btn-primary" type="submit">Search</button>
</form>
</nav>
<div class="container-fluid">
<div class="row justify-content-center">
<div class="col-md-10">
<h3 class="text-center text-dark mt-2">Advanced CRUD App Using PHP & MySQLi Prepared Statement (Object Oriented)</h3>
<hr>
<?php if (isset($_SESSION['response'])) { ?>
<div class="alert alert-<?= $_SESSION['res_type']; ?> alert-dismissible text-center">
<button type="button" class="close" data-dismiss="alert">×</button>
<b><?= $_SESSION['response']; ?></b>
</div>
<?php } unset($_SESSION['response']); ?>
</div>
</div>
<div class="row">
<div class="col-md-4">
<h3 class="text-center text-info">Add Record</h3>
<form action="action.php" method="post" enctype="multipart/form-data">
<input type="hidden" name="id" value="<?= $id; ?>">
<div class="form-group">
<input type="text" name="name" value="<?= $name; ?>" class="form-control" placeholder="Enter name" required>
</div>
<div class="form-group">
<input type="email" name="email" value="<?= $email; ?>" class="form-control" placeholder="Enter e-mail" required>
</div>
<div class="form-group">
<input type="tel" name="phone" value="<?= $phone; ?>" class="form-control" placeholder="Enter phone" required>
</div>
<div class="form-group">
<input type="hidden" name="oldimage" value="<?= $photo; ?>">
<input type="file" name="image" class="custom-file">
<img src="<?= $photo; ?>" width="120" class="img-thumbnail">
</div>
<div class="form-group">
<?php if ($update == true) { ?>
<input type="submit" name="update" class="btn btn-success btn-block" value="Update Record">
<?php } else { ?>
<input type="submit" name="add" class="btn btn-primary btn-block" value="Add Record">
<?php } ?>
</div>
</form>
</div>
<div class="col-md-8">
<?php
$query = 'SELECT * FROM crud';
$stmt = $conn->prepare($query);
$stmt->execute();
$result = $stmt->get_result();
?>
<h3 class="text-center text-info">Records Present In The Database</h3>
<table class="table table-hover" id="data-table">
<thead>
<tr>
<th>#</th>
<th>Image</th>
<th>Name</th>
<th>Email</th>
<th>Phone</th>
<th>Action</th>
</tr>
</thead>
<tbody>
<?php while ($row = $result->fetch_assoc()) { ?>
<tr>
<td><?= $row['id']; ?></td>
<td><img src="<?= $row['photo']; ?>" width="25"></td>
<td><?= $row['name']; ?></td>
<td><?= $row['email']; ?></td>
<td><?= $row['phone']; ?></td>
<td>
<a href="details.php?details=<?= $row['id']; ?>" class="badge badge-primary p-2">Details</a> |
<a href="action.php?delete=<?= $row['id']; ?>" class="badge badge-danger p-2" onclick="return confirm('Do you want delete this record?');">Delete</a> |
<a href="index.php?edit=<?= $row['id']; ?>" class="badge badge-success p-2">Edit</a>
</td>
</tr>
<?php } ?>
</tbody>
</table>
</div>
</div>
</div>
<script type="text/javascript">
$(document).ready(function() {
$('#data-table').DataTable({
paging: true
});
});
</script>
</body>
</html>In the above codings, you can see I've included a file action.php, In this file, we'll write all logic of CRUD operation, but we'll create this file in the next step. Now next you can see within the head tag I've linked all the Bootstrap 4 CDN links and I've also linked all the CDN links of DataTable. You can also see I've used some PHP script between the body tag, I'm using this for fetching all records from the database and display in the table format. You can see below I've initialised the DataTable.
Creating an action.php file
This is the important file, In which We'll write all the logic and CRUD Operation PHP script, so for this create a file action.php in the root of the project directory. Now just copy the below codes and paste into your file and save them.
<?php
session_start();
include 'config.php';
$update=false;
$id="";
$name="";
$email="";
$phone="";
$photo="";
if(isset($_POST['add'])){
$name=$_POST['name'];
$email=$_POST['email'];
$phone=$_POST['phone'];
$photo=$_FILES['image']['name'];
$upload="uploads/".$photo;
$query="INSERT INTO crud(name,email,phone,photo)VALUES(?,?,?,?)";
$stmt=$conn->prepare($query);
$stmt->bind_param("ssss",$name,$email,$phone,$upload);
$stmt->execute();
move_uploaded_file($_FILES['image']['tmp_name'], $upload);
header('location:index.php');
$_SESSION['response']="Successfully Inserted to the database!";
$_SESSION['res_type']="success";
}
if(isset($_GET['delete'])){
$id=$_GET['delete'];
$sql="SELECT photo FROM crud WHERE id=?";
$stmt2=$conn->prepare($sql);
$stmt2->bind_param("i",$id);
$stmt2->execute();
$result2=$stmt2->get_result();
$row=$result2->fetch_assoc();
$imagepath=$row['photo'];
unlink($imagepath);
$query="DELETE FROM crud WHERE id=?";
$stmt=$conn->prepare($query);
$stmt->bind_param("i",$id);
$stmt->execute();
header('location:index.php');
$_SESSION['response']="Successfully Deleted!";
$_SESSION['res_type']="danger";
}
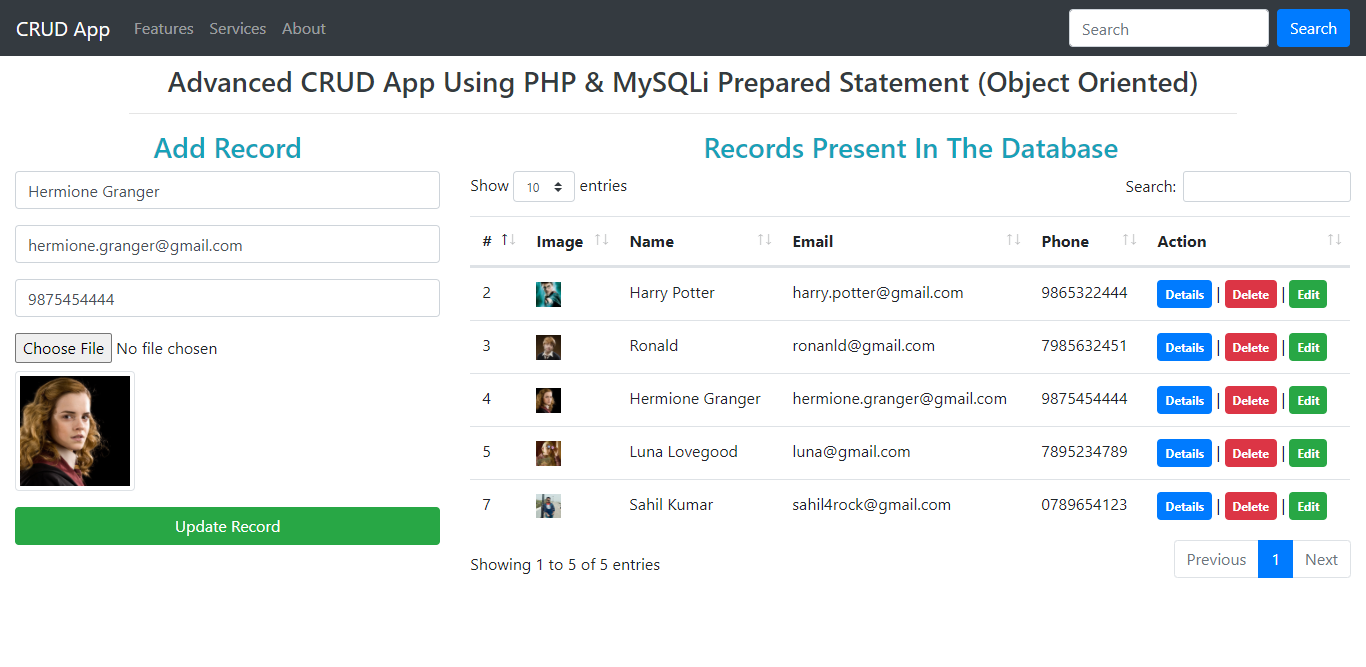
if(isset($_GET['edit'])){
$id=$_GET['edit'];
$query="SELECT * FROM crud WHERE id=?";
$stmt=$conn->prepare($query);
$stmt->bind_param("i",$id);
$stmt->execute();
$result=$stmt->get_result();
$row=$result->fetch_assoc();
$id=$row['id'];
$name=$row['name'];
$email=$row['email'];
$phone=$row['phone'];
$photo=$row['photo'];
$update=true;
}
if(isset($_POST['update'])){
$id=$_POST['id'];
$name=$_POST['name'];
$email=$_POST['email'];
$phone=$_POST['phone'];
$oldimage=$_POST['oldimage'];
if(isset($_FILES['image']['name'])&&($_FILES['image']['name']!="")){
$newimage="uploads/".$_FILES['image']['name'];
unlink($oldimage);
move_uploaded_file($_FILES['image']['tmp_name'], $newimage);
}
else{
$newimage=$oldimage;
}
$query="UPDATE crud SET name=?,email=?,phone=?,photo=? WHERE id=?";
$stmt=$conn->prepare($query);
$stmt->bind_param("ssssi",$name,$email,$phone,$newimage,$id);
$stmt->execute();
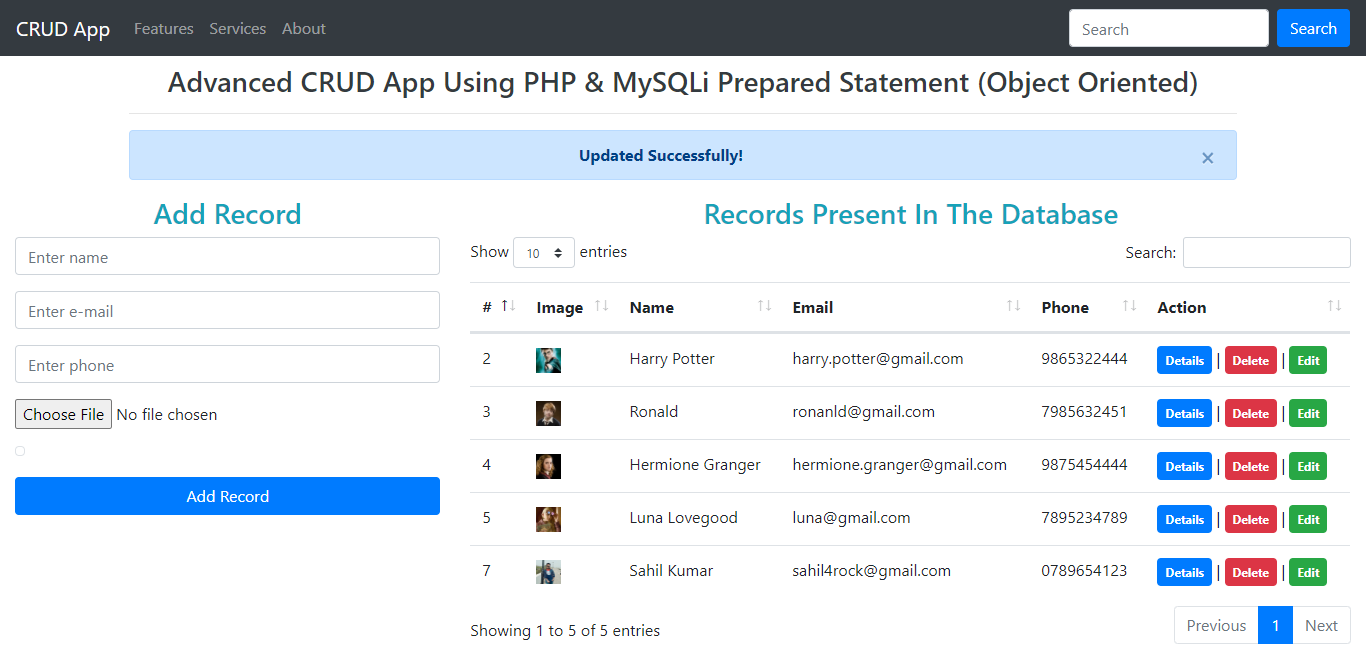
$_SESSION['response']="Updated Successfully!";
$_SESSION['res_type']="primary";
header('location:index.php');
}
if(isset($_GET['details'])){
$id=$_GET['details'];
$query="SELECT * FROM crud WHERE id=?";
$stmt=$conn->prepare($query);
$stmt->bind_param("i",$id);
$stmt->execute();
$result=$stmt->get_result();
$row=$result->fetch_assoc();
$vid=$row['id'];
$vname=$row['name'];
$vemail=$row['email'];
$vphone=$row['phone'];
$vphoto=$row['photo'];
}
?>In the above coding, you can see I'm using the session to store success or failure message and I'm displaying this success failure message in the inedx.php file. Now you can see I'm using the if statement for each CRUD Operation logic. Now next we've to create a new folder "uploads" in the root of the project directory to store the uploaded images. We'll only store the path of images in the MySQL database and We'll move the original image in the uploads folder.
Creating a details.php file
Now in this file, we'll display the details of the user when We click on the Details button on the main page then we'll redirect to this page which will display the user information in details. So for this just copy the below codes and paste them in your file and save.
<?php
  include 'action.php';
?>
<!DOCTYPE html>
<html lang="en">

<head>
  <meta charset="UTF-8">
  <meta name="author" content="Sahil Kumar">
  <meta http-equiv="X-UA-Compatible" content="IE=edge">
  <meta name="viewport" content="width=device-width, initial-scale=1, shrink-to-fit=no">
  <title>CRUD App</title>
  <!-- Latest compiled and minified CSS -->
  <link rel="stylesheet" href="https://maxcdn.bootstrapcdn.com/bootstrap/4.1.3/css/bootstrap.min.css">
  <!-- jQuery library -->
  <script src="https://ajax.googleapis.com/ajax/libs/jquery/3.3.1/jquery.min.js"></script>
  <!-- Popper JS -->
  <script src="https://cdnjs.cloudflare.com/ajax/libs/popper.js/1.14.3/umd/popper.min.js"></script>
  <!-- Latest compiled JavaScript -->
  <script src="https://maxcdn.bootstrapcdn.com/bootstrap/4.1.3/js/bootstrap.min.js"></script>
</head>

<body>
  <nav class="navbar navbar-expand-md bg-dark navbar-dark">
    <!-- Brand -->
    <a class="navbar-brand" href="#">CRUD App</a>
    <!-- Toggler/collapsibe Button -->
    <button class="navbar-toggler" type="button" data-toggle="collapse" data-target="#collapsibleNavbar">
      <span class="navbar-toggler-icon"></span>
    </button>
    <!-- Navbar links -->
    <div class="collapse navbar-collapse" id="collapsibleNavbar">
      <ul class="navbar-nav">
        <li class="nav-item">
          <a class="nav-link" href="#">Features</a>
        </li>
        <li class="nav-item">
          <a class="nav-link" href="#">Services</a>
        </li>
        <li class="nav-item">
          <a class="nav-link" href="#">About</a>
        </li>
      </ul>
    </div>
    <form class="form-inline" action="/action_page.php">
      <input class="form-control mr-sm-2" type="text" placeholder="Search">
      <button class="btn btn-primary" type="submit">Search</button>
    </form>
  </nav>
  <div class="container">
    <div class="row justify-content-center">
      <div class="col-md-6 mt-3 bg-info p-4 rounded">
        <h2 class="bg-light p-2 rounded text-center text-dark">ID : <?= $vid; ?></h2>
        <div class="text-center">
          <img src="<?= $vphoto; ?>" width="300" class="img-thumbnail">
        </div>
        <h4 class="text-light">Name : <?= $vname; ?></h4>
        <h4 class="text-light">Email : <?= $vemail; ?></h4>
        <h4 class="text-light">Phone : <?= $vphone; ?></h4>
      </div>
    </div>
  </div>
</body>

</html>
In the above coding, you can see I've included the action.php file because I've written all the logic here in this file.
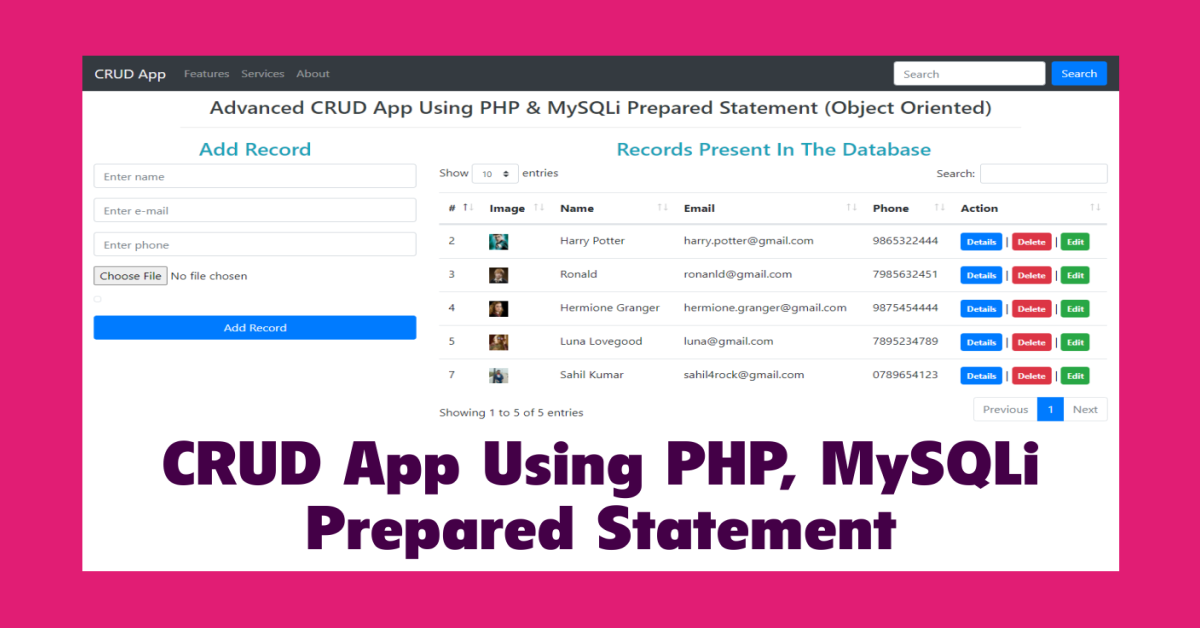
Some Screenshots of the Project
These are some screenshots of the project:


Okay Now, the post is over. I hope you liked this post please share this post. If you have any queries related to this tutorial then just comment down your issue I'll try to fix your issue as soon as possible. And if you want to learn more advanced Web Design & Development then you can visit my YouTube channel.
Sahil Kumar
Full Stack Web Developer
Hello! I'm a part-time blogger & YouTuber living in India. This is my personal blog where I write Web Design & Development tutorial posts!
Know more about me
SUBMIT GUEST POST 🚀
Ready to contribute? Head to the article dashboard to publish your own insightful articles and share them with our audience!
Go to dashboardRECENT POSTS

How Digital Marketing Drives Growth in eCommerce Businesses
7 months ago
Building a Secure Authentication System with PHP OOP, PDO, MySQL, and Bootstrap 5
7 months ago

10 Essential Web Design Principles for Creating a User-Friendly Website
7 months ago

Send Mail with Contact Form Using PHPMailer & Gmail SMTP | 2023
7 months ago
Full Stack Laravel 10 & React JS | SPA Authentication | Part 2
7 months ago